
Table of Contents
The smell of fresh-baked tarts in the kitchen is incredibly heartwarming. It’s not just the scent of the crust or the cherry filling. It’s the way it brings everyone together, eager to enjoy a simple yet unforgettable treat.
For many, baking a mini cherry tart is more than just cooking. It’s about making memories. Whether it’s for a big event or a cozy night in, each bite brings a sense of comfort and nostalgia.
This easy cherry dessert comes from cherished family traditions. It’s filled with love and memories. Whenever I miss home, I make this tart to bring back those joyful moments.
With just a few ingredients and a bit of effort, these tarts are more than a dessert. They’re an experience, bringing the charm of a gourmet bakery into your home.
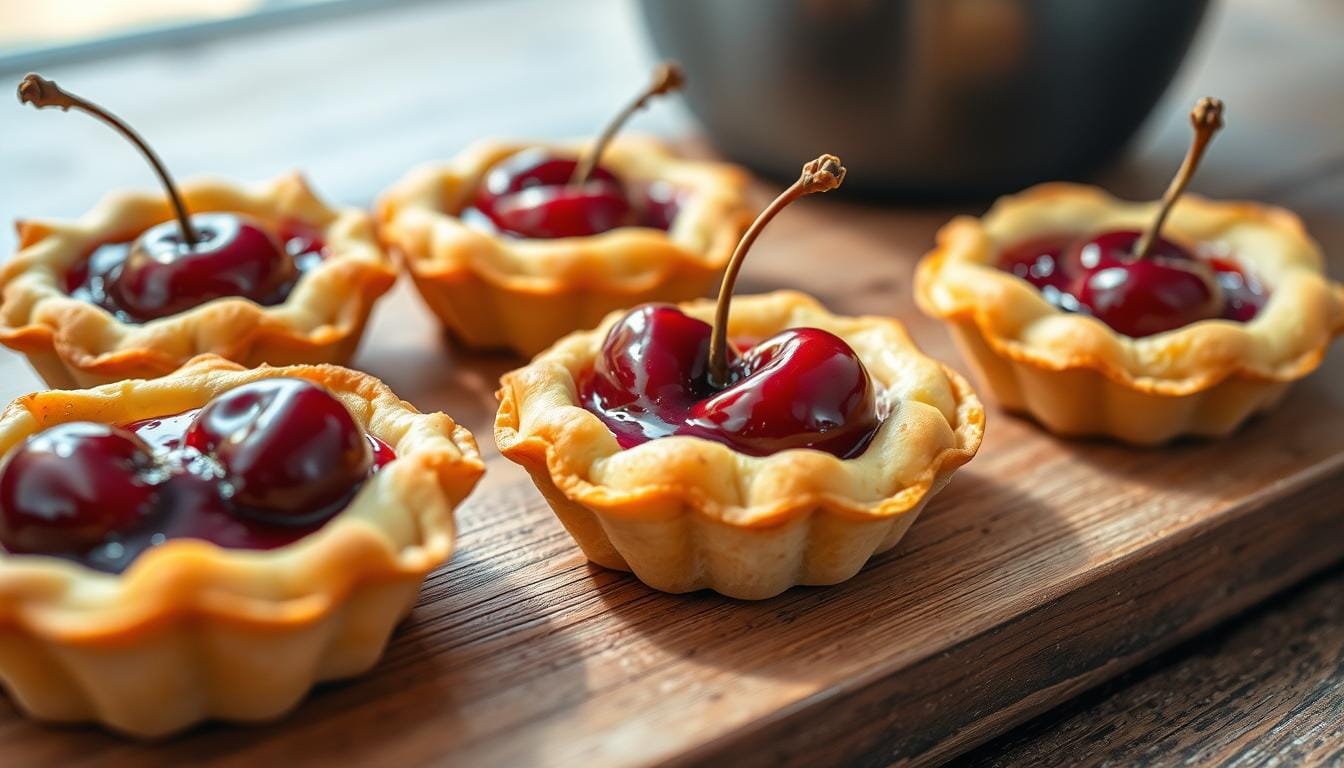
Introduction to Mini Cherry Tarts
Mini Cherry Tarts are a delightful treat that combines a crispy crust with a delicious cherry tart filling. This simple tart recipe has been a dessert staple for centuries. It’s loved for its perfect balance of sweet and tangy flavors. Whether you’re hosting an intimate family dinner or a larger celebration, these tarts are sure to impress your guests.
Why You’ll Love This Recipe
This simple tart recipe is incredibly tasty and easy to make. You’ll need just 4 cups of fresh or frozen cherries and a few pantry staples. The crust, made with 1 ½ cups of all-purpose flour, adds the perfect compliment to the flavorful center.
The Perfect Sweet and Tart Combination
One of the best aspects of Mini Cherry Tarts is their adaptability. The optimal cherry tart filling incorporates ¾ cup of granulated sugar. This balances the natural tartness of the cherries. These tarts bake at 375°F (190°C) for about 35-40 minutes, creating a deliciously golden crust. With a prep time of just 30 minutes, you’ll have these treats ready in no time.
Ingredients Required
To make a delicious mini dessert, you need the right ingredients. A store-bought pie crust and cherry pie filling are key. These make the recipe easy, even for beginners. You can also add your favorite toppings to make it even better.
Store-Bought Pie Crust
A store-bought pie crust is a great choice for a quick start. It’s easy to use and ensures your tart turns out well. The crust adds a flaky, buttery base that complements the cherry filling perfectly.
Cherry Pie Filling
The cherry pie filling is the star of this recipe. You’ll need 3 cups of fresh cherries, 3 tablespoons of sugar, and 1 1/2 teaspoons of cornstarch. This mix creates a rich, fruity filling that’s full of cherry flavor. Baking tips recommend cooking the filling first to improve its taste and texture.
Optional Toppings
For an extra touch, try whipped cream, powdered sugar, or crushed nuts on top. You can also use fresh fruits like berries or peaches. These toppings let you make each tart your own, matching your taste or dietary needs.
Preparation Steps
Making *mini cherry tarts* at home is simple and fun. Follow these easy steps to bake perfect tarts. Here’s a guide to help you make amazing cherry desserts.
Preparing the Crust
First, heat your oven to 350ºF (180°C). Use a muffin tin and line each cup with pie crust. Cut and shape the crust to fit perfectly. Press it evenly to make a strong base for your cherry filling.
Bake the crusts for 15-18 minutes until they’re golden. Use weights or beans to keep them flat.
Filling the Tarts
After the crusts cool a bit, fill them with cherry pie filling. Use about 2-3 tablespoons for each tart. Don’t overfill to avoid spills.
Make sure the filling is spread evenly. This ensures every bite is sweet.
Baking Tips
Now, bake the filled tarts for 25-30 minutes. This will make the crust fully baked and the filling bubbly. The total bake time is 40-50 minutes.
The tart should hold its shape and not be too runny. Let it cool for 1-2 hours before serving. This will enhance the texture and flavor.

| Nutrition Fact | Amount per Serving (100g) | % Daily Value |
|---|---|---|
| Calories | 260 | |
| Total Carbohydrates | 25g | 21% |
| Protein | 4g | 7% |
| Total Fat | 16g | 28% |
| Saturated Fat | 9g | 15% |
| Sugar | 12g | 24% |
| Sodium | 35mg | 15% |
| Fiber | 2g | 72% |
By following these steps, your mini cherry tarts will be beautiful and delicious. They’re perfect for any special occasion.
Mini Cherry Tart Recipe
Making a easy cherry dessert is simple with the right ingredients and steps. This homemade tart is both beautiful and delicious. It’s great for any event, like potlucks, BBQs, parties, and holidays. Here’s how to make your own tasty mini cherry tarts.
- Preheat your oven to 375°F (190°C).
- Roll out the pie crust on a floured surface to 1/8-inch thickness.
- Use a round cutter to cut out circles from the crust and press them into a tart pan.
- Spoon the cherry pie filling into each crust, ensuring it’s evenly distributed. The total filling needed is about 2 cups.
- In a small bowl, beat 1 egg with 1 tablespoon of water to prepare the egg wash.
- Brush the edges of each tart with the egg wash, and sprinkle with granulated sugar for added sweetness.
Bake the tarts for 15-20 minutes, or until the crust is golden brown. Watch them closely to avoid overbaking. Let them cool for at least 15 minutes before serving. This step helps the filling set and improves the texture.
Enjoy your mini cherry tarts with whipped cream or vanilla ice cream. This homemade tart can be stored in the fridge for 3 to 4 days. This way, you can enjoy it fresh whenever you like.
If you have a lot of cherries, like 7 pounds, you’ll have enough for this recipe. You can also freeze the mini tarts for up to 6 months. Just thaw and bake for an extra 10-15 minutes until golden brown.
| Details | Info |
|---|---|
| Prep time | 15 minutes |
| Cook time | 15-20 minutes |
| Oven temperature | 375°F (190°C) |
| Ingredients | 4 (store-bought pie crust, cherry pie filling, egg wash, granulated sugar) |
| Crust thickness | 1/8-inch |
| Storage duration | 3 to 4 days in the fridge |
| Occasions for serving | potlucks, BBQs, parties, holiday season |
| Egg wash ratio | 1 egg beaten with 1 tablespoon of water |
| Average baking time | 15-20 minutes for golden brown crust |
| Pairs well with | whipped cream or vanilla ice cream |
Tips for the Perfect Tart Crust
Making the perfect mini tart crust for your cherry pastry might seem hard. But with a few simple tips, you’ll get a delicious result. Let’s make sure your crust turns out just right!
Choosing the Right Pie Crust
Choosing the right pie crust is key for a cherry pastry. Go for a buttery, flaky crust to match the sweet and tart cherry filling. Classic French tart doughs like pâte sucrée and pâte brisée are great choices.
European-style butter, with 82 to 85% butterfat, makes your crust better than American butter. This small difference in butterfat content makes a big difference in taste and texture.
Pre-baking the Crust
Pre-baking, or blind baking, your mini tart crust helps avoid sogginess. It gives your cherry pastry a firm base. To pre-bake, bake the crust at 350℉ (175℃) for 20 to 30 minutes, flipping halfway.
This step is key, more so if your filling is moist. Start by covering the crust with parchment paper or foil. Fill it with pie weights or dried beans. Bake until it’s lightly golden before adding your cherry filling.
Alternative Crust Options
Want to try something different? Try graham cracker or Oreo crusts for unique flavors in your cherry pastry. These crusts can be just as tasty and pair well with the sweet cherry filling.
A graham cracker crust, made from crushed crackers, melted butter, and sugar, is easy to make. Press it into your tart pan and bake briefly. It gives your tarts a strong base. Oreo crusts add a chocolaty twist, making your dessert even more special.
Making Your Own Cherry Pie Filling
Want to make your homemade tart stand out? Try making your own cherry tart filling from scratch. It’s easy and adds a special touch that store-bought fillings can’t. Here’s what you need and how to make a delicious filling for your mini cherry tarts.

Ingredients for Homemade Filling
Here’s what you’ll need for a tasty cherry tart filling:
- 1 cup cherries (fresh, canned, jarred, or frozen)
- 2 tablespoons sugar (adjustable to taste)
- ½ tablespoon cornstarch
- 2 tablespoons water (or orange juice for enhanced flavor)
- 1 tablespoon lemon juice
- 1 teaspoon pure vanilla extract
- ¼ teaspoon almond extract (optional for flavor enhancement)
Step-by-Step Instructions
Here’s how to make your cherry tart filling:
- Prepare the cherries. If using fresh cherries, remove the pits. You’ll need about 1.5 lbs of cherries, cut into halves or quarters.
- Combine ingredients. In a saucepan, mix the cherries with 2 tablespoons of sugar, ½ tablespoon of cornstarch, 2 tablespoons of water, and 1 tablespoon of lemon juice. Stir well to coat the cherries.
- Cook the mixture. Heat the saucepan over medium heat and bring to a simmer. Cook for 5-10 minutes, stirring often, until thickened. Test by drawing a finger through a small amount on a plate; if a stripe remains, it’s ready.
- Add the extracts. Remove from heat and stir in 1 teaspoon of vanilla extract and ¼ teaspoon of almond extract.
- Cool the filling. Let the filling cool before using. This ensures it sets and flavors meld together.
This homemade cherry tart filling makes about 1 cup. Store it in a sealed container in the fridge for up to 1 week. Enjoy it in your mini cherry tarts and see the homemade difference!
Nutritional Information (per serving):
- Calories: 198 kcal
- Total Carbohydrates: 51 g
- Protein: 2 g
- Total Fat: 1 g
- Saturated Fat: 1 g
- Sodium: 2 mg
- Potassium: 306 mg
- Dietary Fiber: 3 g
- Total Sugars: 42 g
- Vitamin A: 90 IU
- Vitamin C: 15.5 mg
- Calcium: 18 mg
- Iron: 0.5 mg
Variations on the Mini Cherry Tart Recipe
Trying new versions of the mini cherry tart recipe keeps your desserts exciting. You can experiment with different fruits or add unique flavors. This opens up a world of possibilities to make this treat even more delightful.
Using Different Fruit Fillings
Change up your mini cherry tart with different fruits. Blueberries offer a tangy twist, while apple filling is sweet and comforting. Peaches are perfect for summer, and raspberries balance sweetness with tartness. Your imagination is the only limit when picking fruits for this dessert tart.
Flavor Enhancements
Elevate your mini cherry tart with tasty flavor boosts. A bit of almond extract adds a rich depth. Citrus zest, like lemon or orange, brings a refreshing touch. Vanilla bean or cinnamon can add warmth and complexity. Each addition makes your tart a special treat tailored to your taste.
Serving Suggestions
Once your mini cherry tarts are ready, it’s time to serve them. These easy cherry desserts are great for any event. Here are some ways to make your presentation stand out:
Pairing with Whipped Cream or Ice Cream
Top each tart with whipped cream or vanilla ice cream. The creaminess goes well with the tart cherry filling. It adds a rich taste to every bite. For a special touch, try making whipped cream with vanilla or almond extract.
Garnishing Ideas
Garnishing makes your mini dessert look amazing. Use fresh cherries, mint leaves, or powdered sugar for elegance. You can also drizzle chocolate or caramel sauce for extra flavor.
The mini dessert recipe is simple, so you can get creative. The many garnishing options make your desserts a hit at any event.
Storing and Reheating
Keeping your mini tart crust and cherry desserts fresh is key to enjoying them for days. Follow these simple tips to keep your mini cherry tarts as tasty as when they’re first baked.
Proper Storage Tips
Store your mini cherry tarts in an airtight container in the fridge for the best taste. They can stay fresh for up to three days. Fruit pies, like cherry desserts, can last up to seven days in the fridge. But, it’s best to eat them within four days for the best flavor and texture.
Pie crusts can stay fresh at room temperature in airtight containers for up to three days. Whole fruit pies, including cherry desserts, can be frozen for up to four months if stored right.

Reheating Instructions
To get that freshly baked crispness back, reheat your mini cherry tarts in the oven. Preheat to 350°F and place them on a baking sheet. Reheat for 10-15 minutes until the crust is crisp and the filling is warm.
If you’re short on time, the microwave can also work. Place the tart on a microwave-safe plate and heat for 15 to 30 seconds. But, the microwave might not make the crust as crisp as the oven.
Getting airtight containers can make your baked goods last up to 50% longer. It’s a great addition to your kitchen, ensuring your cherry desserts are always ready when you want them.
Common Questions and Troubleshooting
When making a simple tart recipe, you might run into some issues. Let’s look at some common questions and tips to help your mini cherry tarts come out right every time.
Preventing Soggy Crusts
A key part of our simple tart recipe is pre-baking the crust. This step sets the crust before adding the filling, so it doesn’t get soggy. Here’s how to do it:
- Preheat your oven to 425°F (218°C).
- Roll out the dough to a ¼ inch thickness and press it into the tart pans.
- Prick the bottom of the crust with a fork to allow steam to escape.
- Pre-bake the crust for about 15-18 minutes.
By following these steps, you’ll get a golden and flaky crust for your tarts.
Adjusting Sugar Levels
The sweetness of the cherry tart filling can be adjusted to your liking. Cherries can vary in sweetness, so you might need to adjust the sugar:
- Start with ⅔ cup of granulated sugar, which is enough for most fillings.
- If you like it sweeter, add more sugar, up to ¾ cup or more.
- For a balance, keep the original sugar amount but add a teaspoon of lemon zest and 1½ tablespoons of lemon juice.
Remember, these tips not only make a delicious tart but also improve your baking skills. You’ll become a true home baking master! Happy baking!
Additional Mini Dessert Recipes
Explore the world of mini desserts! These treats add elegance to any event. Here’s a simple yet satisfying mini dessert recipe.
This easy cherry dessert is great for any party. It has a perfect crust-to-filling ratio. Making the mini tart shells is easy:
- 1½ cups (180 g) of unbleached flour
- ⅓ cup (67 g) of powdered sugar
- ½ cup (114 g) of unsalted butter
- 1 egg yolk
- 1 tablespoon heavy cream
These ingredients make dough for 18 mini tart shells. Bake at 350°F for 13 to 16 minutes. This makes the shells golden and ready to fill.
The filling is a creamy pastry cream. It’s made with:
- 2¾ cups (624 g) of milk
- ⅔ cup (133 g) of sugar
- ¼ cup (32 g) of cornstarch
- 4 egg yolks
Bake the filled tarts at 400°F (200°C) for 10 minutes. Then, bake for 3-4 more minutes until golden. Top with ¼ cup (85 g) of currant jelly.
Each tart has about 104 calories, 12 grams of carbs, and 1 gram of protein. They also have 32 milligrams of potassium and 7 milligrams of calcium.
Store the baked and cooled tart shells at room temperature for up to 2 days. The pastry cream can be stored in the fridge for up to 3 days. This keeps it fresh for when you need a dessert.
These mini desserts are perfect for impressing guests or enjoying a quiet moment. They’re easy to make and delicious. Happy baking!
Conclusion
This mini cherry tart recipe is perfect for anyone wanting a tasty homemade treat. It’s easy to make, thanks to simple steps and flexible ingredients. Even beginners can make delicious tarts with store-bought pie crust and homemade cherry filling.
The recipe is also very versatile. It’s great for family dinners or potlucks. The mix of sweet and tart flavors will surely impress everyone. Feel free to try different fillings or toppings to make it your own.
Baking is all about the fun, not just the end result. So, grab your ingredients, heat up your oven, and start baking. Enjoy making these delicious homemade tarts!
FAQ
What ingredients do I need for the Mini Cherry Tart Recipe?
You’ll need a store-bought pie crust, cherry pie filling, and optional toppings like whipped cream or fresh fruits. You can also make your own filling with fresh cherries, sugar, and cornstarch.
Can I use a homemade pie crust instead of a store-bought one?
Yes, you can! A homemade pie crust adds a special touch. Choose a buttery, flaky one for the best taste.
How do I prevent the tart crust from getting soggy?
Pre-bake the crust for a few minutes before adding the filling. Also, don’t overfill the crusts to avoid soggy bottoms.
Can I make my own cherry pie filling?
Yes, making your own filling is easy and rewarding. Use fresh cherries, sugar, and cornstarch. Follow the instructions for a tart and sweet filling.
What are some alternative crust options?
Try different crusts like graham cracker or Oreo for a unique taste. These options can add a fun twist to the classic tart.
How do I store the mini cherry tarts?
Keep them in an airtight container in the fridge for up to five days. Reheat them briefly in the oven to make the crust crisp again before serving.
Can I use different fruit fillings?
Yes, you can use fillings like blueberry, apple, or peach. Get creative and try different flavors.
What are some serving suggestions for mini cherry tarts?
Serve with whipped cream or ice cream for extra indulgence. Add fresh cherries, mint, or powdered sugar for a nice touch.
How can I enhance the flavor of the cherry filling?
Add almond extract or citrus zest to the filling for extra flavor. Customize it to your liking for a unique taste.
How do I ensure the filling is evenly distributed?
Use a spoon to spread the filling evenly in each crust. Avoid overfilling to prevent spills during baking.
What should I do if my mini tarts don’t turn out as expected?
If crusts are soggy, pre-bake them slightly. Adjust the sugar in the filling to taste. These tips can help improve your next batch.