
Table of Contents
Imagine turning your kitchen into a gourmet dessert studio. Here, individual dessert portions become edible works of art. Mini dessert cups have changed how we enjoy sweet treats, making them bite-sized and delightful.
These small desserts are more than just treats. They mix creativity with convenience, letting home cooks make impressive desserts. Professional chefs and home bakers alike love making mini dessert cups. They turn simple ingredients into amazing experiences.
Whether you’re an experienced baker or new to the kitchen, mini dessert cups are fun and easy. Each cup tells a unique flavor story. You can make everything from classic cheesecake to adventurous fruit parfaits.
In this guide, we’ll show you how to make stunning mini dessert cups. You’ll see how they change dessert making. Get ready to explore a world of delicious, perfectly sized sweet treats!
What Are Mini Dessert Cups?
Petite sweets have changed the dessert world. They turn big treats into small, tasty bites. Tasting cups are a fun trend in food, mixing taste, looks, and ease.
These small desserts add fun to meals. They’re great for trying new flavors and controlling how much you eat.
Definition and Popularity
Mini dessert cups are small, single-serve sweets. They come in:
- Small glass containers
- Edible pastry shells
- Disposable mini cups
- Chocolate or cookie-based vessels
Versatile Serving Options
These small treats are loved for their flexibility. They’re perfect for any event, thanks to chefs and home cooks.
| Cup Size | Recommended Use | Typical Desserts |
|---|---|---|
| 2-3 oz | Individual Tasting | Mousse, Pudding Shots |
| 5-6 oz | Personal Serving | Yogurt Parfaits, Mousses |
| 8-10 oz | Sharing Portion | Ice Cream Sundaes, Layered Desserts |
“Mini dessert cups transform ordinary sweets into extraordinary culinary experiences.”
Serving tip: Prepare 2-3 mini desserts per guest to ensure variety and satisfaction.
Essential Tools for Preparing Mini Dessert Cups
Making sample-size treats needs the right kitchen tools and planning. Professional bakers know that the right tools make small treats special.

Kitchen Equipment You’ll Need
Mini dessert cups need precise tools. Here’s what you’ll need to improve your baking:
- Piping bags with various tip sizes
- Small offset spatulas
- Measuring cups and spoons
- Electric hand mixer or stand mixer
- Small cookie scoops
- Sharp paring knife
Choosing the Right Serving Cups
Choosing the right cups is key for presenting small treats. Here are some good options:
| Cup Type | Best For | Capacity |
|---|---|---|
| Clear Glass Cups | Elegant presentations | 2-3 ounces |
| Disposable Plastic Cups | Outdoor events | 4-9 ounces |
| Edible Cups | Creative desserts | 1-2 ounces |
“The right serving cup can transform a simple dessert into a stunning culinary experience.”
When picking containers for small treats, look for clear, durable, and pretty ones. Make sure they hold about 2 ounces of filling for the right size.
Ingredients for Delectable Mini Dessert Cups
Making tiny treats needs the right ingredients. These ingredients turn simple desserts into unforgettable moments. The perfect mix of flavors and textures makes mini desserts stand out.
Choosing top-notch, fresh ingredients is key. Professional bakers know how to pick the to make treats that are hard to resist.
Classic Flavor Combinations
Some flavors are always a hit in desserts:
- Chocolate and raspberry
- Vanilla and caramel
- Lemon and blueberry
- Strawberry and cream cheese
Seasonal and Local Ingredients
Using seasonal produce makes desserts special. Local ingredients add unique tastes and freshness to mini desserts.
| Season | Recommended Ingredients |
|---|---|
| Summer | Fresh berries, peaches, mint |
| Autumn | Pumpkin, apple, cinnamon |
| Winter | Cranberries, pomegranate, dark chocolate |
| Spring | Rhubarb, strawberries, lavender |
“Great desserts start with exceptional ingredients” – Culinary Experts
Focus on freshness, quality, and what’s in season. Local farmers markets are great for finding unique dessert ideas.
Step-by-Step Guide to Making Mini Dessert Cups
Making individual dessert portions needs careful planning and precise techniques. Mini dessert cups are a delightful way to serve elegant treats. They impress guests and offer perfect portion control.
Preparing the Perfect Base Layer
The foundation of great mini dessert cups starts with a solid base. Here are some options for a delicious start:
- Graham cracker crumbs for classic texture
- Crushed cookie bases for added crunch
- Soft cake layers for a lighter approach

When preparing the base, make sure it’s uniform. This creates visually appealing mini dessert cups that show off each layer.
Creating Delicious Fillings
Choosing the right filling makes individual dessert portions spectacular. Here are some filling techniques:
- Creamy mousse for luxurious texture
- Rich pudding for classic flavor
- Smooth cheesecake mixture for decadent layers
“The secret to amazing mini dessert cups lies in balancing flavors and textures.”
Pro tip: Make fillings ahead of time to let flavors meld. Refrigerate for 1-2 hours before assembling. This ensures the best taste and consistency.
Creative Decorating Techniques for Mini Dessert Cups
Turning bite-sized treats into works of art is all about presentation and design. With the right decorating techniques, even simple desserts can become culinary wonders. These techniques add both beauty and depth of flavor.
Stunning Toppings and Garnishes
Decorating mini dessert cups is a mix of creativity and precision. Top chefs suggest some top garnishing tips:
- Fresh berries for vibrant color bursts
- Chocolate shavings for elegant texture
- Edible flowers for sophisticated presentation
- Whipped cream swirls for classic touch
Innovative Stacking and Layering Ideas
Layering is key to making mini sweets visually stunning. Mix different textures and flavors to create unforgettable treats.
“The art of mini desserts lies in their ability to tell a complex story in just one bite.” – Pastry Chef Elena Rodriguez
Try using clear cups to show off your layers. Mixing colors and textures can turn simple desserts into culinary masterpieces.
Professional Presentation Techniques
- Use varying cup heights for dynamic displays
- Create color-coordinated arrangements
- Incorporate unexpected garnish elements
Pro tip: Invest in small decorating tools like piping bags and precision tweezers to elevate your mini dessert presentation.
Mini Dessert Cup Recipe Ideas
Exploring miniature confections opens up a world of delightful tasting cups. They combine flavor, presentation, and creativity. With 45 variations of desserts in cups, home bakers can craft impressive treats. These treats wow guests and satisfy sweet cravings.

- Control portion sizes
- Easy to prepare in advance
- Perfect for dinner parties
- Visually appealing presentation
Chocolate Mousse Delight
Create a rich, decadent chocolate experience with this classic tasting cup recipe:
- Ingredients:
- 8 oz dark chocolate
- 1 cup heavy cream
- 3 egg yolks
- 2 tbsp sugar
- Melt chocolate using double boiler method
- Whip cream until soft peaks form
- Fold ingredients gently
- Chill for 2 hours
“Chocolate mousse transforms simple ingredients into an elegant miniature confection.” – Pastry Chef Maria Rodriguez
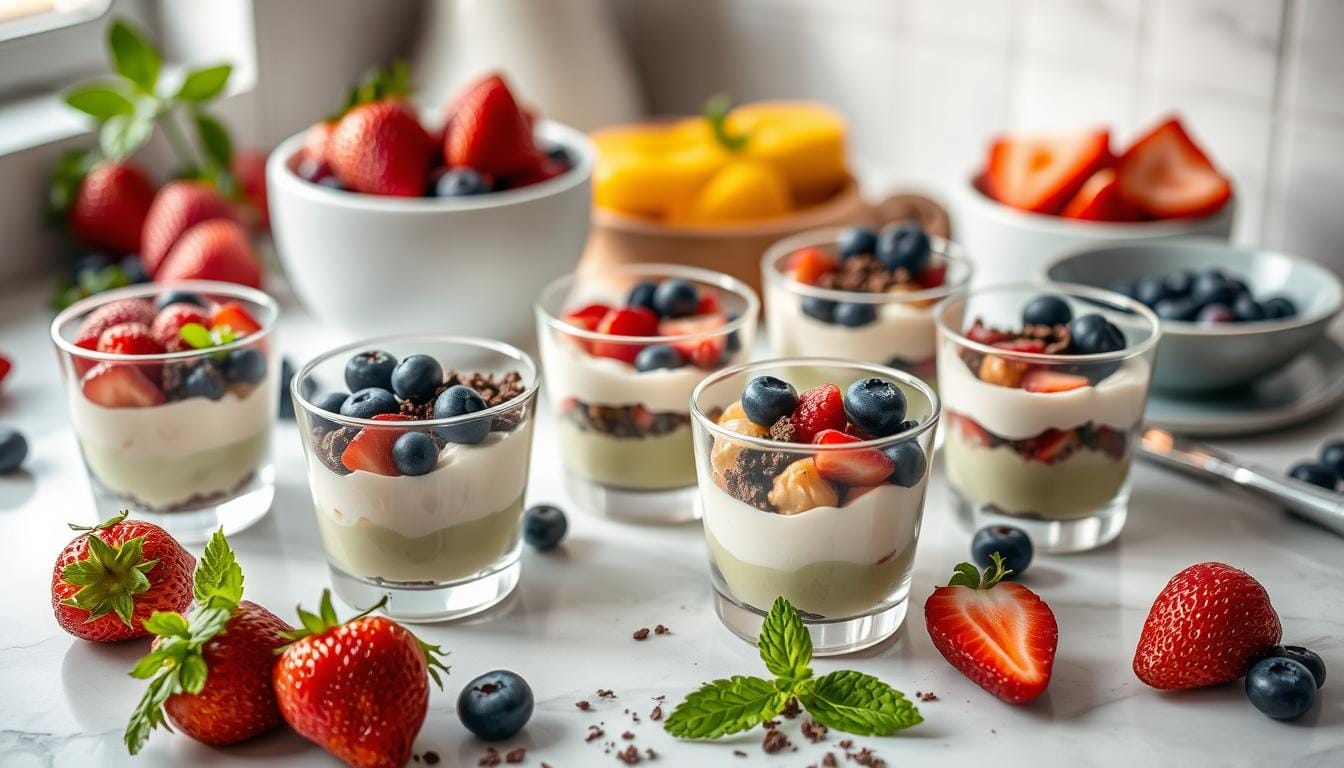
Fruit Parfait with Yogurt
A lighter alternative that celebrates fresh seasonal ingredients:
- Ingredients:
- Greek yogurt
- Fresh berries
- Honey
- Granola
- Layer yogurt in tasting cups
- Add fresh fruit
- Drizzle honey
- Sprinkle granola on top
These miniature dessert cups require about 30 minutes to prepare. They yield around 28 servings. They can be refrigerated for 2-3 days, making them perfect for advance planning.
Best Practices for Serving Mini Dessert Cups
Making sample-size delights is more than just cooking. It’s about how you present them too. Serving mini dessert cups is all about looks and practicality.
- Choose serving dishes that match your dessert’s style
- Think about the temperature and timing to keep flavors fresh
- Make your desserts look good to make guests want to try them
Presentation Perfection
Here’s how to make your mini desserts look amazing:
- Use the same cups for a neat look
- Put desserts on stands for a wow factor
- Add garnishes that stand out to make it look even better
Storage Strategies
Storing your mini desserts right keeps them fresh and tasty. Keeping them in the fridge is key.
“The secret to perfect mini dessert cups lies not just in preparation, but in precise storage techniques.”
Here’s how to store your desserts:
- Put them in the fridge right after you make them
- Use containers that keep air out to stop moisture
- Eat them within 2-3 days for the best taste
- Keep toppings safe with a light cover
Professional chefs know that mini desserts are special. They’re not just small treats. They’re experiences that please both your taste and your eyes.
Incorporating Dietary Restrictions
Today, making tiny indulgences for different diets is key in baking. Dessert samplers must consider various nutritional needs. This way, everyone can enjoy tasty treats.
Dietary restrictions don’t mean you have to give up on taste or looks. Home bakers can make delicious mini dessert cups for many diets. They do this by choosing the right ingredients.
Gluten-Free Alternatives
Gluten-free dessert cups are possible with smart ingredient swaps:
- Use almond flour or gluten-free graham cracker crumbs for crusts
- Replace wheat-based ingredients with rice flour or coconut flour
- Make sure all ingredients are gluten-free
Vegan and Dairy-Free Solutions
To make vegan dessert samplers, you need to get creative with ingredients:
- Substitute dairy cream with coconut cream
- Use plant-based milk alternatives
- Replace eggs with chia or flax seeds
| Dietary Restriction | Key Ingredient Substitutions | Flavor Impact |
|---|---|---|
| Gluten-Free | Almond flour, rice flour | Minimal change in texture |
| Vegan | Coconut cream, plant milks | Subtle nutty undertones |
| Dairy-Free | Cashew cream, soy alternatives | Creamy consistency preserved |
*Expert Tip: Always test alternative ingredients to maintain the integrity of your tiny indulgences.*
With these tips, dessert samplers can become inclusive treats. They bring joy to everyone, no matter their dietary needs.
How to Customize Mini Dessert Cups for Events
Creating personalized mini dessert cups makes any event unforgettable. They offer a great way to show off your creativity and style. Each dessert is a unique treat for guests.
Event planners can make their mini dessert cups stand out. They can use design that fits the event’s theme and style. This makes the dessert a key part of the celebration.
Event Theme Customization Strategies
- Match color schemes with event decor
- Select containers that reflect celebration style
- Incorporate branded elements
Flavor Profiles for Different Celebrations
| Event Type | Recommended Flavors | Color Palette |
|---|---|---|
| Wedding | Champagne mousse, white chocolate | Ivory, blush, gold |
| Birthday | Chocolate fudge, funfetti | Vibrant rainbow |
| Corporate Event | Espresso semifreddo | Monochromatic grays |
Choosing eco-friendly mini dessert cups is good for the planet. They cost between $0.12 and $0.50 per unit. This makes them a budget-friendly choice for customization.
Personalized dessert cups transform ordinary events into extraordinary memories.
Good design makes each dessert a highlight of the event. It adds to the overall look and feel of the celebration.
Tips for Hosting a Mini Dessert Cup Tasting Party
Make your next party special with a mini dessert cup tasting. These treats let guests try many flavors without feeling full. Choose a variety of sweets with different textures and tastes for everyone to enjoy.
Plan your menu carefully for a great tasting. Offer 2-3 mini desserts per guest for a good taste without too much. Southern Living suggests using seasonal ingredients and flavors like chocolate mousse and strawberry shortcake.
Decorate your dessert station to impress. Use clear containers and tiered displays for a beautiful look. This also lets guests see the layers of the desserts. Set up themed stations for different seasons, like pumpkin mousse in fall or berry parfaits in summer, to keep things interesting.
FAQ
What exactly are mini dessert cups?
Mini dessert cups are small, individual desserts in containers like shot glasses or small mason jars. They’re perfect for trying different flavors without feeling too full.
How far in advance can I prepare mini dessert cups?
You can make most mini dessert cups 1-2 days ahead. Just keep them in an airtight container in the fridge. Don’t add toppings like fresh fruit or whipped cream until right before serving.
What are the best containers for mini dessert cups?
Good containers include clear shot glasses, small mason jars, and edible pastry cups. Clear ones show off the dessert’s layers, making it look as good as it tastes.
How can I make mini dessert cups gluten-free?
Use gluten-free bases like almond flour or crushed gluten-free cookies instead of traditional crusts. Make sure all ingredients, including fillings and toppings, are gluten-free.
What are some crowd-pleasing flavor combinations?
Favorites include chocolate and raspberry, lemon and blueberry, and salted caramel. Mix rich and light flavors to offer a variety of tastes.
Can mini dessert cups be frozen?
Yes, some can be frozen, like those with mousse or custard fillings. But avoid freezing those with fresh fruit or cream. Freeze tightly and eat within 2-3 weeks.
How many mini dessert cups should I prepare per person?
For a dessert-only event, plan for 2-3 cups per person. For events with many desserts, aim for 1-2 cups per guest to avoid overloading.
What are some vegan mini dessert cup alternatives?
Use coconut cream, silken tofu, and dairy-free yogurt for vegan options. Nut-based crusts and fresh fruits or dairy-free chocolate shavings make great toppings.